WordPress
The HIPAAtizer WordPress plugin lets you embed HIPAA-compliant forms on any WordPress page or post using a shortcode or Gutenberg block. All Protected Health Information (PHI) submitted through embedded forms goes directly to HIPAAtizer's HIPAA-compliant environment: it never passes through or is stored on your WordPress host.
Prerequisites
- An active HIPAAtizer account (Covered Entity or Developer). Don't have one? Sign up for a free trial, no credit card required.
- At least one published form in your HIPAAtizer account.
- WordPress 4.6 or later. PHP 5.6 or later.
- Administrator access to your WordPress site.
No. Because all PHI goes directly to HIPAAtizer's infrastructure, your WordPress host does not need to be HIPAA-compliant. You can use any standard WordPress host.
Step 1: Install the Plugin
- In your WordPress admin, go to Plugins → Add New Plugin.
- Search for HIPAAtizer.
- Click Install Now on the HIPAAtizer plugin, then click Activate.
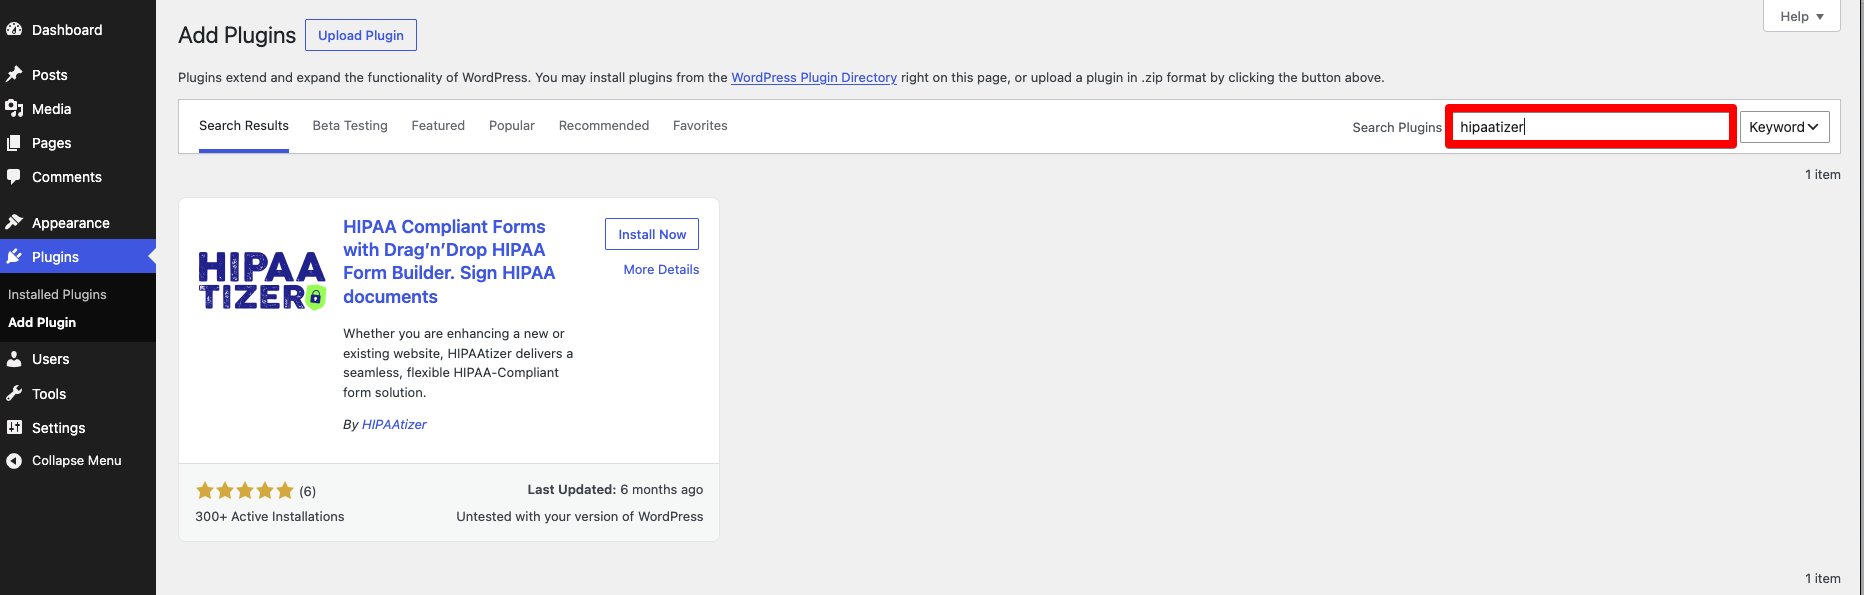
You can also install manually: download the .zip from wordpress.org/plugins/hipaatizer, then go to Plugins → Add New Plugin → Upload Plugin.
After activation, HIPAAtizer appears in your WordPress left-hand navigation menu.
Step 2: Connect Your Account
Click HIPAAtizer in the left navigation. You will see the welcome screen with three options.
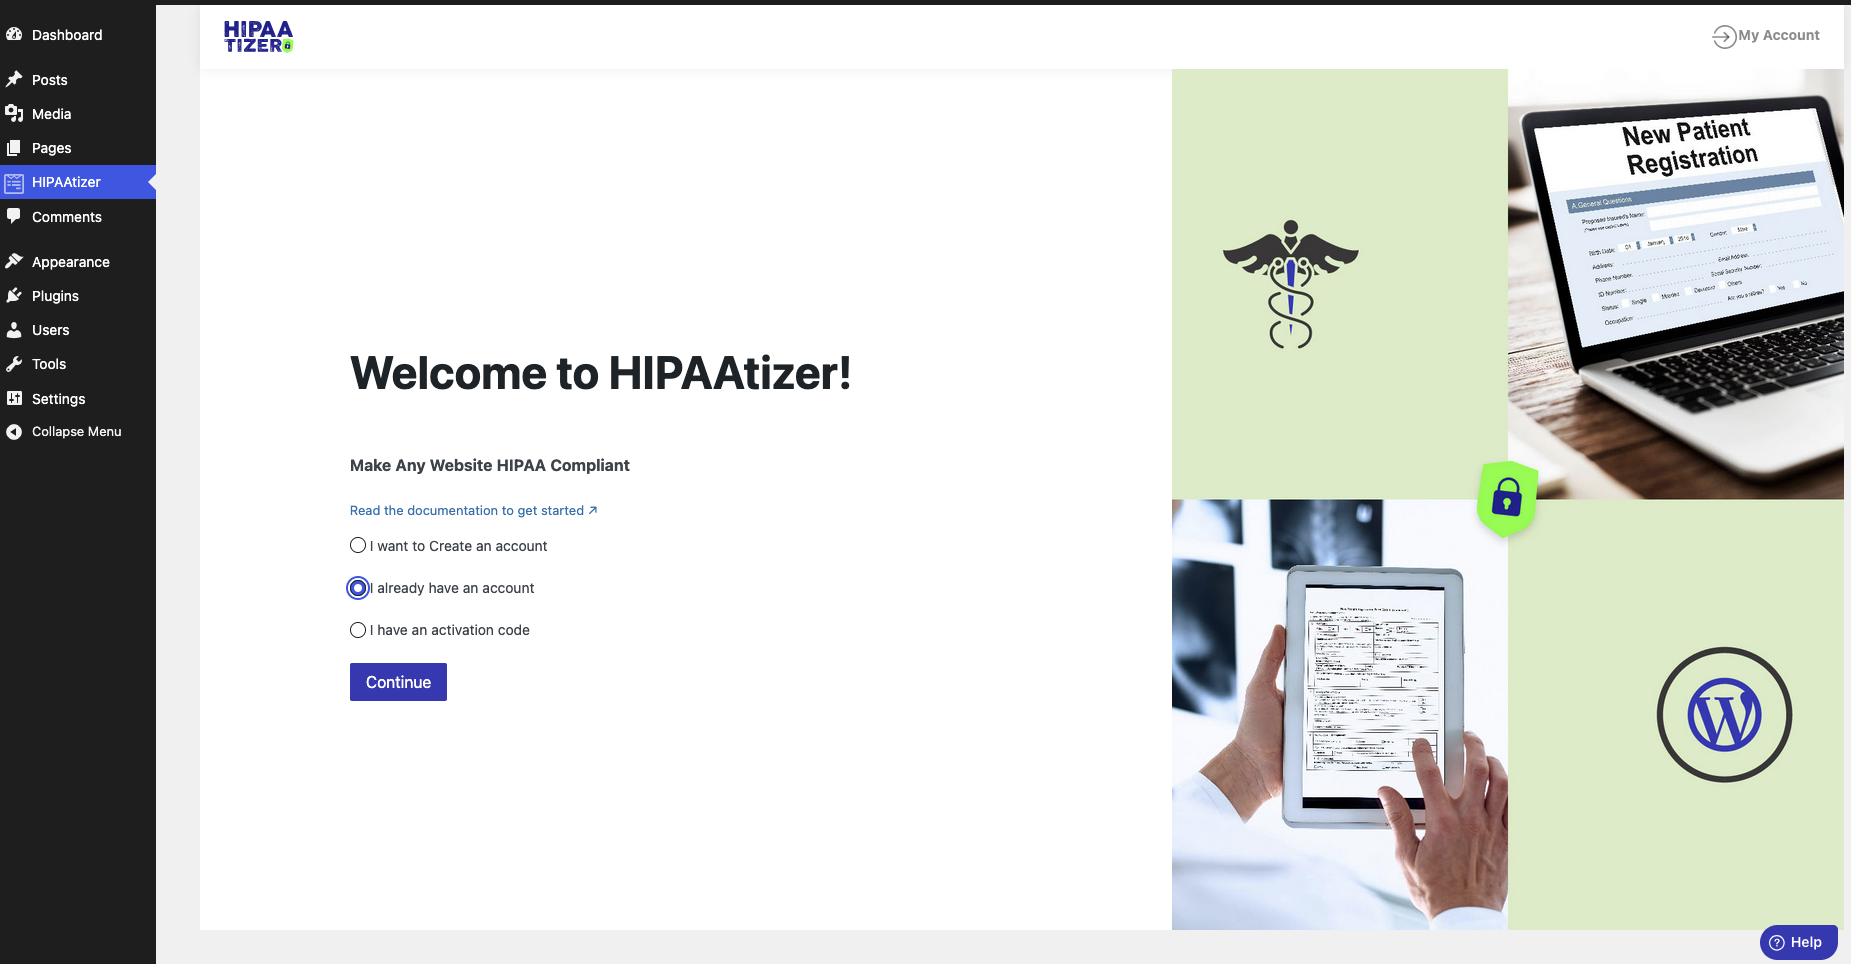
Choose the option that matches your situation:
Option A: Create a new account
Select I want to Create an account and click Continue. You will be taken to the HIPAAtizer sign-up page. After completing registration, you will be redirected back to WordPress and your account will be automatically linked.
Option B: Log in to an existing account
Select I already have an account and click Continue. Log in to your HIPAAtizer account in the window that opens. After logging in, you will be redirected back to WordPress with your account linked.
Option C: Use an activation code
Select I have an activation code and click Continue. Enter your 32-character activation code and click Continue.

Where to find your activation code:
- In the HIPAAtizer Dashboard under My Forms → Form Settings → Integrations → WordPress
- Or under the Team menu → Activation Code tab
Make sure you have switched into the client's Covered Entity account before copying the activation code. The activation code is account-specific: using a code from the wrong account will link the plugin to that account instead. See Switching Between Accounts for instructions.
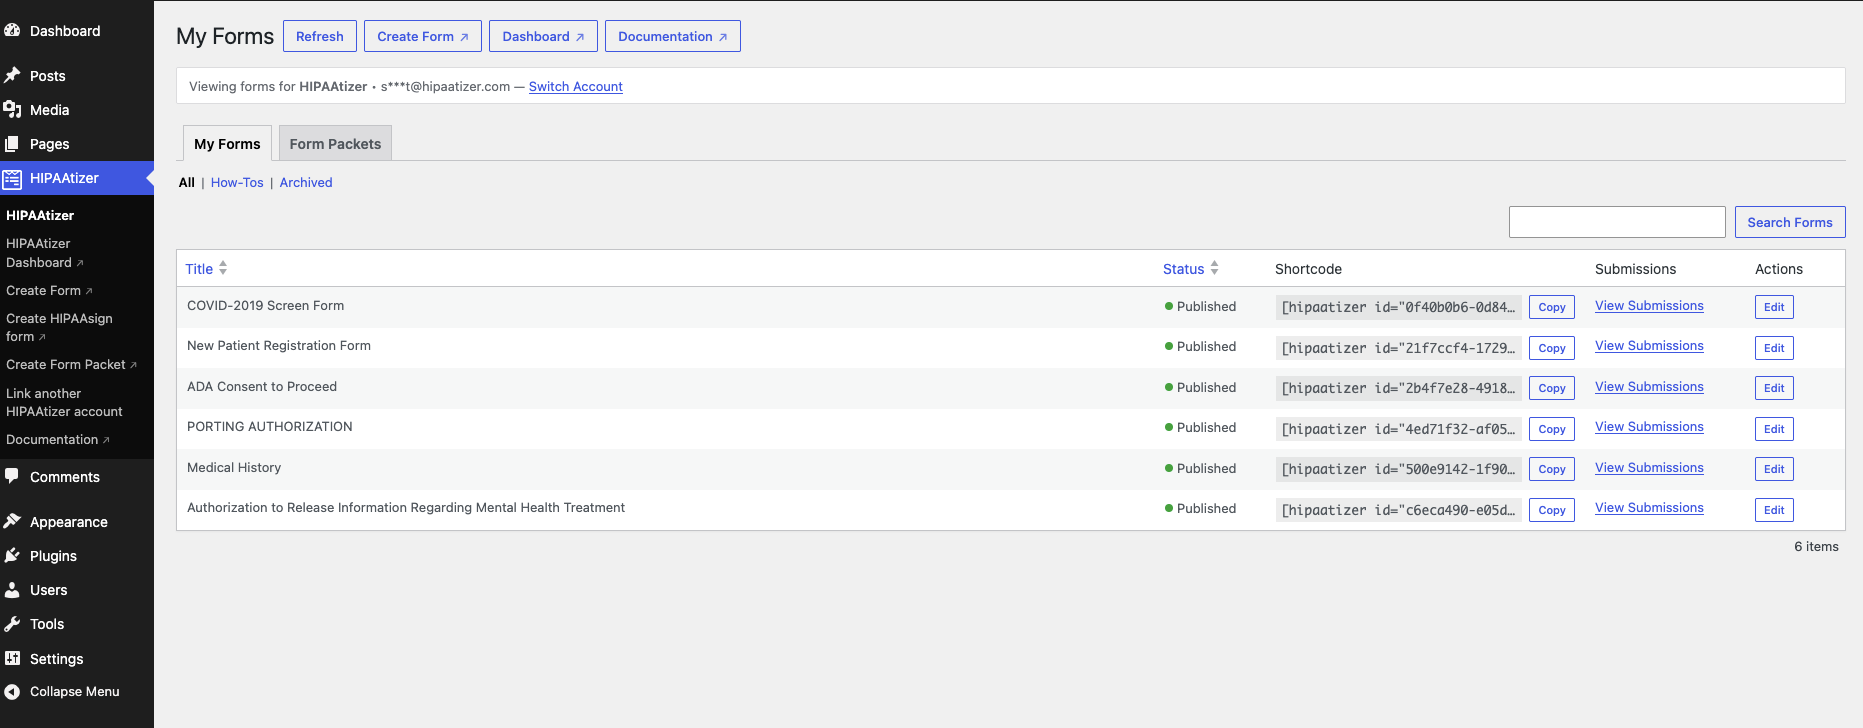
Once connected, the plugin dashboard shows your account name, email, and a list of your published forms.
Step 3: Embed a Form
Each published form has a unique shortcode displayed in the plugin dashboard. Copy the shortcode for the form you want to embed.
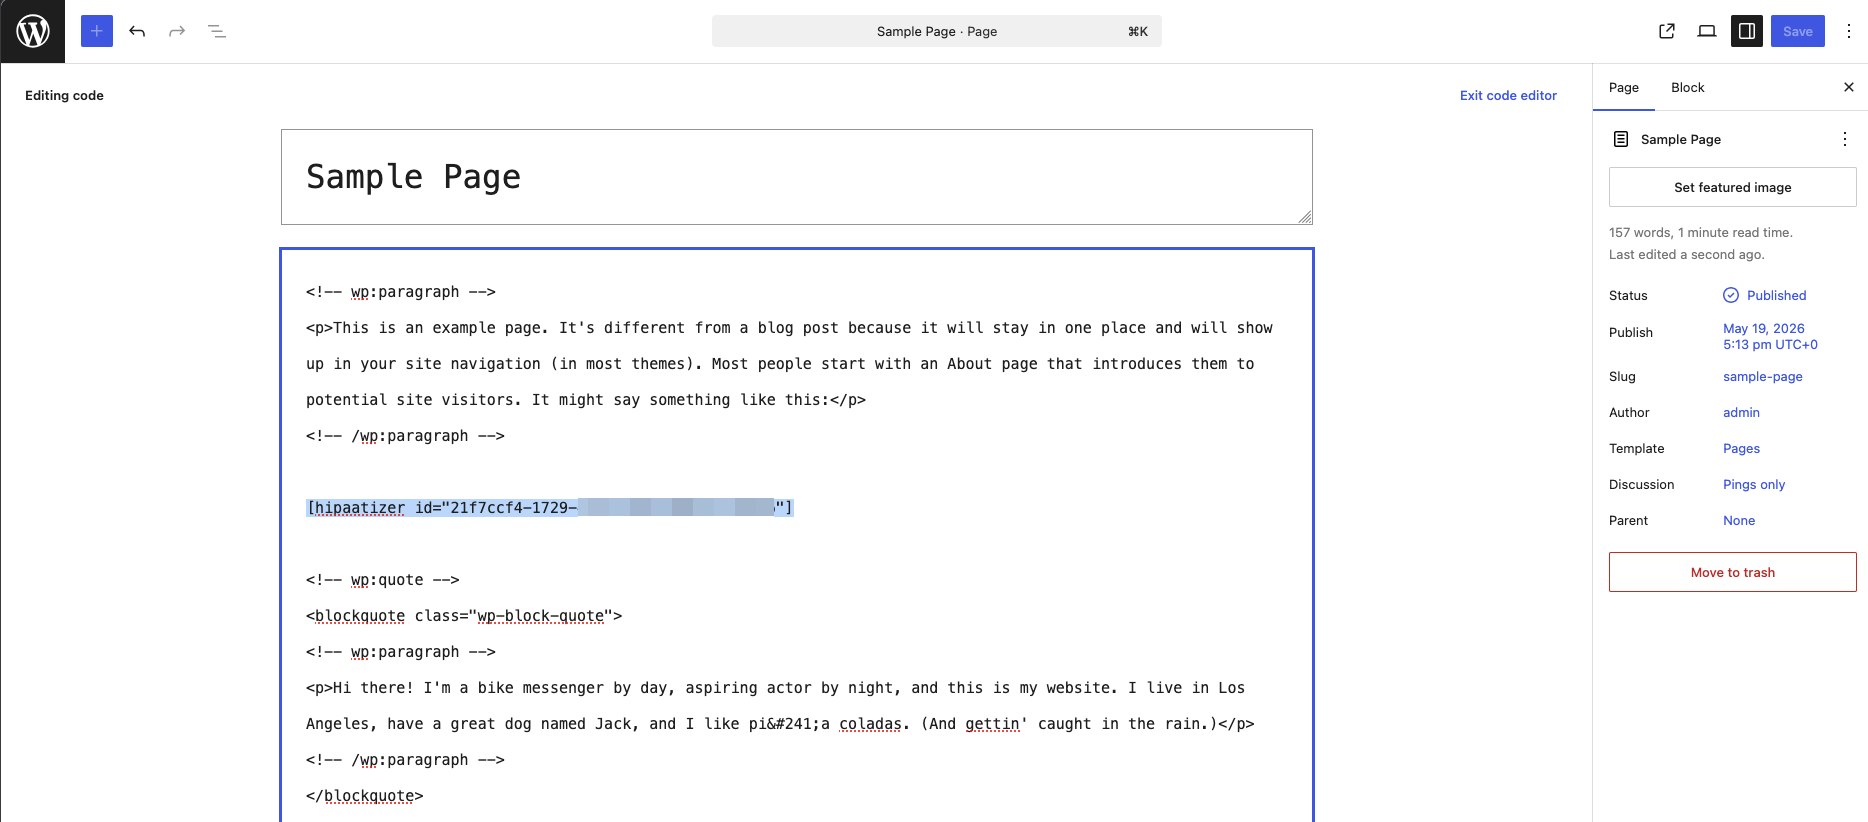
Using the shortcode��
Paste the shortcode into any page, post, or widget that supports shortcodes:
[hipaatizer id="xxxxxxxx-xxxx-xxxx-xxxx-xxxxxxxxxxxx"]
You can also copy the shortcode directly from inside your HIPAAtizer account: go to My Forms → Form Settings → Integrations → WordPress and copy the shortcode from there.
Using the Gutenberg block
- In the block editor, click + to add a new block.
- Search for HIPAAtizer and select the HIPAAtizer Form block.
- Use the dropdown in the block to select the form you want to display.
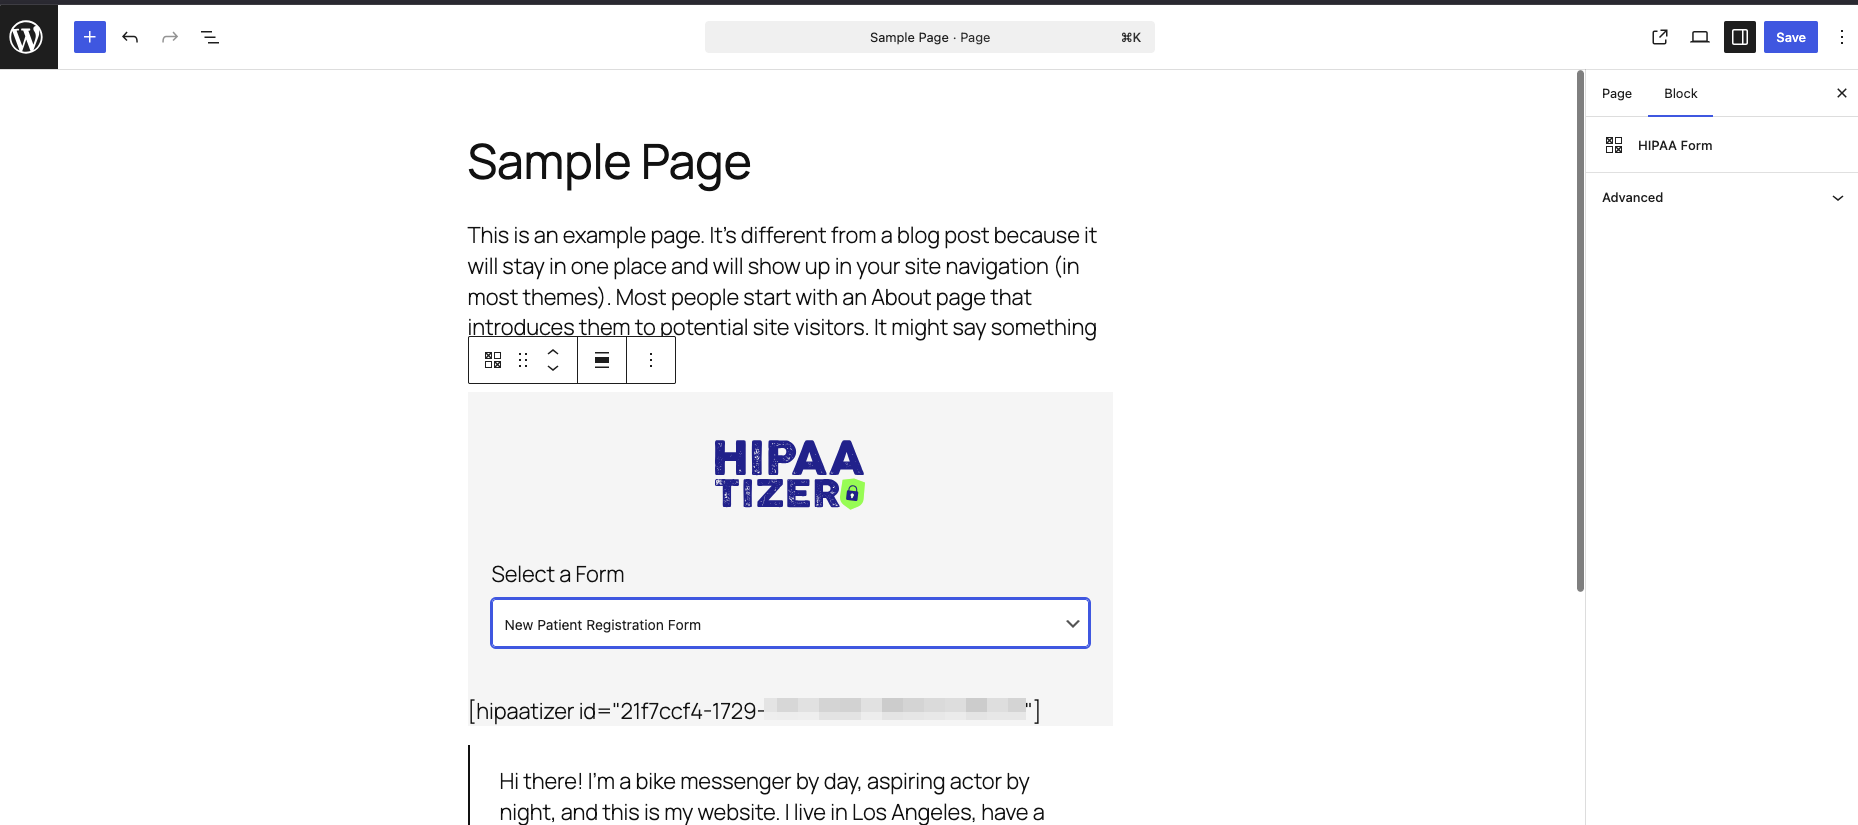
The block saves the form selection and renders the form on the front end when the page is published.
Step 4: Embed a Form Packet
Form Packets are embedded exactly the same way as regular forms, using either the shortcode or the Gutenberg block.
Using the shortcode: on the plugin dashboard (WordPress admin → HIPAAtizer), switch from the My Forms tab to the Form Packets tab and copy the shortcode for the packet you want to embed. Paste it into any page, post, or widget that supports shortcodes.
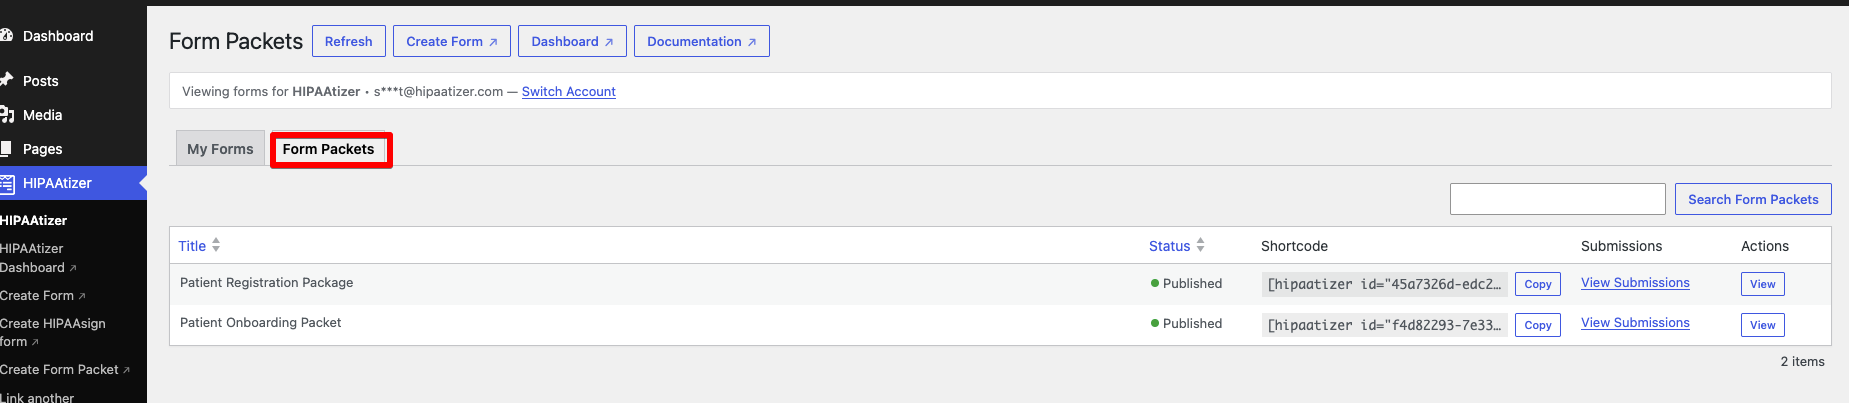
Using the Gutenberg block: add the HIPAAtizer Form block as described in Step 3. The block's dropdown lists both published forms and Form Packets, so you can select a packet the same way you'd select a form.
Switching Accounts
If your WordPress site needs to link to a different HIPAAtizer account, click Switch Account in the plugin dashboard. You will be taken back to the welcome screen to connect a new account using any of the three options above.
WordPress Multisite
The HIPAAtizer plugin supports WordPress Multisite networks. Each site in the network stores its own linked account independently, allowing different subsites to connect to different HIPAAtizer accounts. Activate the plugin network-wide from the Network Admin → Plugins screen.
Troubleshooting
Forms are visible when logged in as admin but not to public visitors
This is most commonly caused by a JavaScript optimization plugin (such as WP Rocket) deferring or minifying scripts for non-logged-in users.
To fix with WP Rocket:
- Go to Settings → WP Rocket → File Optimization.
- Add the following to the Excluded JavaScript Files field (under both Minify and Combine sections if enabled):
hipaatizer-form-renderer.jshipaatizer
- Go to Settings → WP Rocket → Advanced Rules → Delay JavaScript Execution and add the same exclusions.
- Click Save Changes, then click Clear Cache.
- Verify the form appears in an incognito / private browser window.
Other caching or performance plugins may have similar settings: look for "exclude scripts" or "deferred JS exclusions" in their configuration.
The activation code is not accepted
- Make sure you are entering the full 32-character code with no leading or trailing spaces.
- Confirm the code belongs to the account you intend to link. Activation codes are account-specific.
- If you are a Developer, confirm you have switched into the correct Covered Entity account before copying the code. See Switching Between Accounts.
- Activation codes do not expire, but each code is tied to one account: using a code a second time on a different site connects both sites to the same account.
The plugin dashboard shows a blank form list
- Confirm your HIPAAtizer account has at least one published form. Draft forms do not appear in the list.
- Try clicking the Refresh button in the plugin dashboard to reload the form list from HIPAAtizer.
- If the list was recently refreshed, results are cached for up to one hour. Wait and try again, or deactivate and reactivate the plugin to clear the cache.
"Could not load forms. Please try again."
The plugin could not reach the HIPAAtizer API. Check:
- Your server can make outbound HTTPS requests to
app.hipaatizer.com. - There are no firewall rules blocking outbound connections on port 443.
- Your WordPress error log for any
wp_remote_getfailures.
Plugin table not created on Multisite
On some Multisite configurations, the plugin may not create its database table automatically due to permission restrictions. If this happens, the shortcode will still render the form correctly: the table is only used to store the linked account ID. To resolve permanently, deactivate and reactivate the plugin from the Network Admin → Plugins screen with a database user that has CREATE TABLE permission.