

Webhooks
Webhooks let you push form submission data to any external system that accepts HTTPS requests. Each time a form is submitted (or updated, deleted, or saved as a draft), HIPAAtizer sends a configurable HTTP request to a URL you specify. You control the URL, the HTTP method, the headers, and the exact shape of the request body, so webhooks can drive almost any downstream integration: CRMs, marketing platforms, internal APIs, automation tools, and more.
If you're connecting to a popular service, check the Templates dropdown first. HIPAAtizer ships with prebuilt templates for HighLevel, Mailchimp, and Airtable, and you can save your own configurations as reusable templates.
Webhooks send form data, which may include Protected Health Information (PHI), to systems outside HIPAAtizer. Before pointing a webhook at a third-party service, confirm that the receiving system is HIPAA-compliant and that you have a Business Associate Agreement (BAA) in place with that vendor. Only send non-sensitive fields to systems that are not BAA-covered.
What you can do with this feature
- Send submissions to any HTTPS endpoint using POST, PUT, PATCH, or DELETE.
- Trigger requests on Created, Updated, Deleted, or Form Save and Continue events.
- Map form fields and system variables into a fully customizable JSON request body.
- Add custom headers (e.g.,
Authorization,x-api-key) for authenticated APIs. - Verify request authenticity on your side using the signed Hipaa-Signature header.
- Save reusable templates for your most common webhook configurations.
- Import and export webhooks as JSON to move them between forms or accounts.
Requirements
- An active HIPAAtizer account with at least one published form.
- A receiving endpoint that accepts HTTPS requests. The endpoint must be reachable from the public internet.
- The Unique Names of the form fields you want to include in the payload. You can find these in the Form Builder by clicking on any field and checking its Unique Name property.
Where to find it
Webhooks are configured per form, under the Integrations tab in Form Settings.
- Go to My Forms.
- Click the Form Settings icon next to the form you want to configure.
- Open the Integrations tab.
- Click the Webhooks tile.
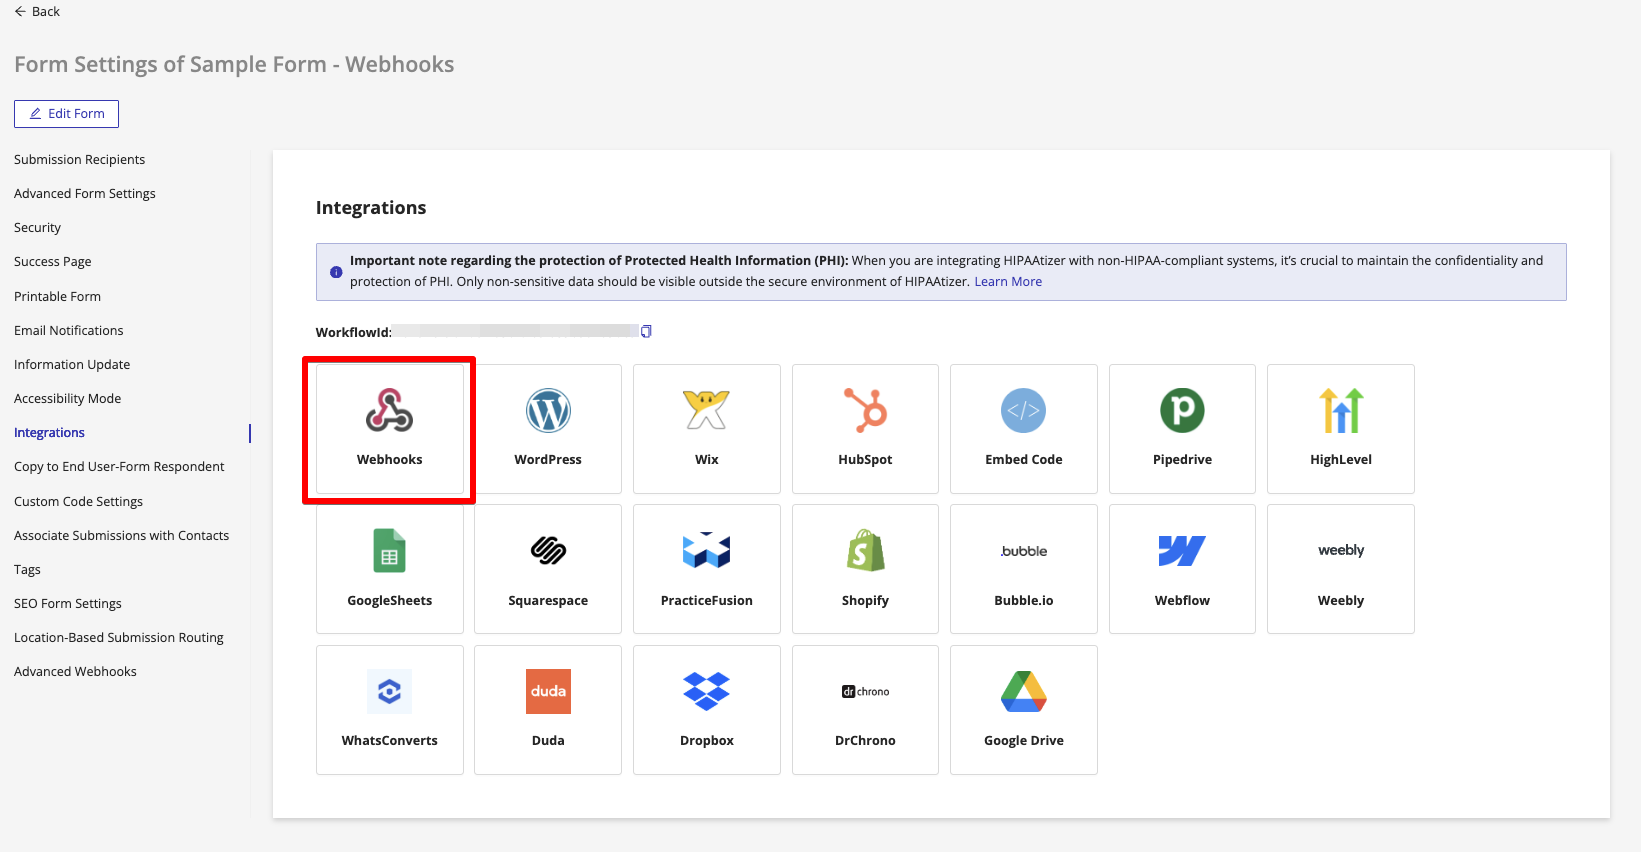
You'll land on the Webhooks list page, which shows all webhooks currently configured for this form along with their URL, type, and status.
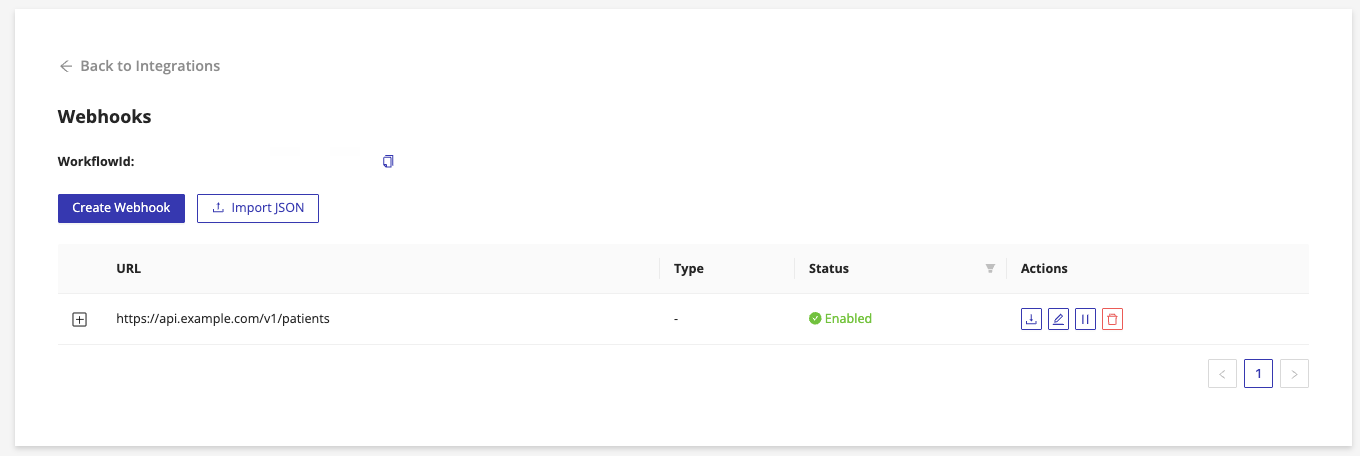
How it works
When a triggering event occurs on the form, HIPAAtizer assembles an HTTP request from your configuration and sends it to the URL you provided. The request includes a set of automatically-calculated security headers, any custom headers you added, and a JSON body built from your form fields and selected system variables.
Events
A webhook fires on one or more of these events:
| Event | When it fires |
|---|---|
| Created | A new form submission is completed and saved. |
| Updated | An existing submission is edited (e.g., from the Inbox or via Information Update). |
| Deleted | A submission is deleted. |
| Form Save and Continue | A respondent saves a partial submission to continue later. |
A single webhook can listen for multiple events. The Hipaa-EventType header on the outgoing request tells your endpoint which event triggered it.
Default headers
Every webhook request includes these headers, calculated automatically when the request is sent:
| Header | Purpose |
|---|---|
Content-Type | Always application/json. |
Content-Length | Body size in bytes. |
Host | Destination host derived from your URL. |
traceparent | W3C trace context for debugging delivery. |
Hipaa-Signature | HMAC signature of the request body. Use this to verify the request really came from HIPAAtizer. |
Hipaa-EventType | The event that triggered the webhook (e.g., Created). |
Hipaa-DeliveryId | Unique ID for this delivery attempt, useful for idempotency. |
Hipaa-Timestamp | ISO 8601 timestamp of when the request was generated. |
Custom headers
You can add any additional headers your endpoint requires. The most common is Authorization (for Bearer tokens or Basic auth) or x-api-key for API-key-based services.
Templates
HIPAAtizer ships with templates that pre-fill the URL, headers, and request body for common integrations:
- HighLevel: Contact - Create
- Mailchimp: Add Member
- Airtable: Create Record
Selecting a template gives you a working starting point: you just plug in your own credentials and form field mappings.
You can also save your own configurations as templates using the Save as Template button at the bottom of the webhook editor. Saved templates appear in the Manage Templates list and can be reused on any form within the same account.
Templates are scoped to the account where they're saved. They are not automatically shared with sub-accounts or Covered Entities managed by an Enterprise account.
Configure
Step 1: Open the webhook editor
From the Webhooks list, click Create Webhook to open the editor in create mode. To start from an exported JSON file, click Import JSON instead.
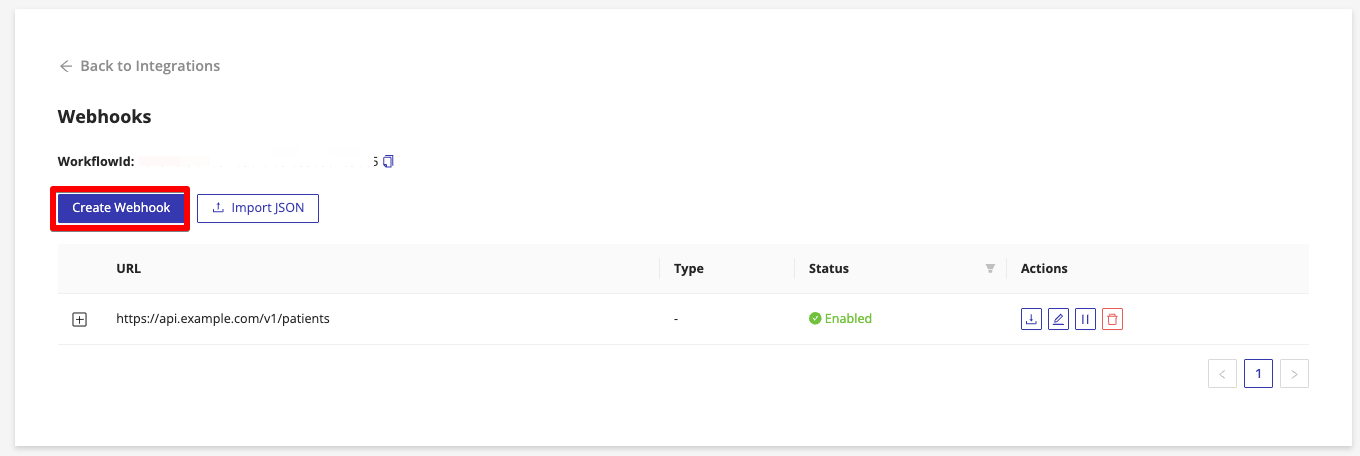
Step 2: Pick a starting point
At the top of the editor, the Templates dropdown lets you start from a prebuilt configuration. If your destination isn't covered by a template, leave it blank and configure everything from scratch.
Step 3: Enter the URL
In the URL field, paste the full HTTPS endpoint that should receive the request, including the protocol (https://) and any path segments.
Example: https://api.example.com/v1/contacts
Step 4: Select the HTTP method
Open the HTTP Method dropdown and choose POST, PUT, PATCH, or DELETE. The right choice depends on your endpoint: most "create a record" APIs use POST, while update endpoints typically use PUT or PATCH.
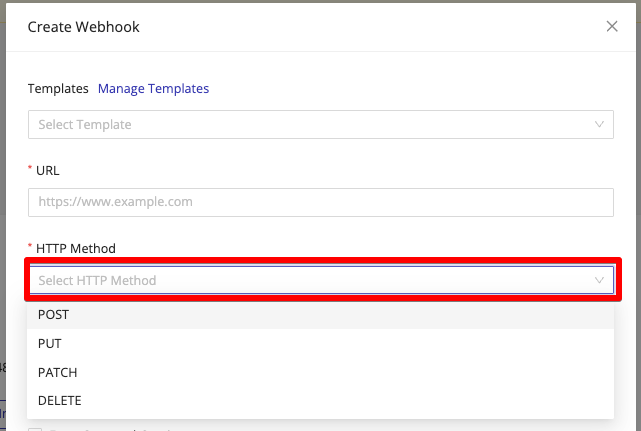
Step 5: Choose which events trigger the webhook
Under Events, check one or more of:
- Created: fire when a new submission is completed.
- Updated: fire when an existing submission is edited.
- Deleted: fire when a submission is deleted.
- Form Save and Continue: fire when a respondent saves a partial submission.
Most integrations only need Created.
Step 6: Add custom headers (optional)
If your endpoint requires authentication or any other custom header, scroll down to Custom Headers and click + Add Row.
For Basic Auth, the header value must start with the word Basic followed by a space and the Base64-encoded username:password. A common mistake is putting Basic Auth in the header key; the key must be exactly Authorization.
Step 7: Build the request body
In the Request field, write the JSON body your endpoint expects. Click Insert Fields & Variables to open a picker with every available form field and system variable. Click any chip to insert it at the cursor.
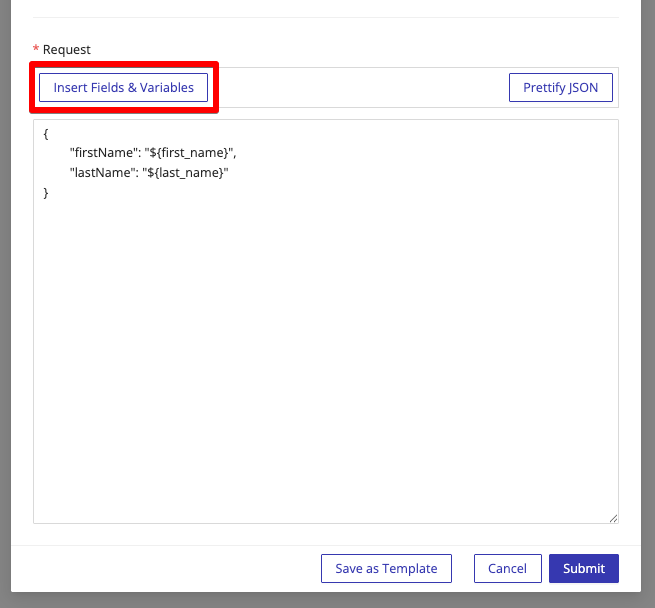
Form variables use the ${uniqueName} syntax, where uniqueName is the Unique Name of the field in the Form Builder. System variables let you reference the submission ID, the form ID, location details, profile information, and links to the submission PDF.
Example request body:
{
  "name": "${name}",
  "email": "${email}",
  "subject": "${subject}",
  "message": "${message}",
  "submission_id": "${submissionId}",
  "form_id": "${workflowId}",
  "pdf_link": "${downloadPdfLink}"
}
Use ${workflowId} to reference the form's unique ID. Unlike the form name, the workflow ID is stable across form edits and re-publishes, making it the safest identifier to use when your downstream system needs to know which form a submission came from.
Click Prettify JSON at any time to clean up the formatting.
Step 8: Save
Click Submit to save the webhook. The new entry appears in the Webhooks list with its URL and status. To save the current configuration as a reusable template, click Save as Template before submitting.
Use cases
Send leads from a Contact Us form to a CRM
See step-by-step instructions
Goal: Every time someone submits the Contact Us form, create a new contact in your CRM.
- Open My Forms → Form Settings → Integrations → Webhooks on the Contact Us form.
- Click Create Webhook.
- From the Templates dropdown, select the template that matches your CRM (e.g., HighLevel: Contact - Create), or start blank.
- Paste your CRM's API endpoint into URL and set HTTP Method to POST.
- Check the Created event.
- Add an
Authorizationheader with your API token under Custom Headers. - In the Request body, map your form fields to the CRM's expected fields using Insert Fields & Variables.
- Click Submit.
Result: Each new submission immediately creates a contact in your CRM, with the form fields mapped into the CRM's contact properties.
Send the submission PDF to a remote storage endpoint
See step-by-step instructions
Goal: Forward a link to the submission PDF to a storage or document-management endpoint each time a form is submitted.
- Create a webhook on the form.
- Set the destination URL to your storage endpoint and HTTP Method to POST.
- Check the Created event.
- In Request, include
"pdf_link": "${downloadPdfLink}"along with any metadata fields your storage system expects. - Save.
Result: Your storage system receives the PDF link on every new submission and can fetch the file on demand using its existing credentials.
Concatenate two fields into a single payload value
See step-by-step instructions
Goal: Send a single full_name value to a downstream system that doesn't accept separate first and last name fields.
- In the Form Builder, add a hidden Paragraph component to the form.
- Set its content to
${FirstName} ${LastName}(using the Unique Names of your first and last name fields). - Give the Paragraph its own Unique Name (e.g.,
fullName). - In your webhook's Request body, reference
${fullName}.
Result:
The webhook sends a concatenated full_name value built from the two form fields.
Verifying the Hipaa-Signature header
Every outgoing webhook request includes a Hipaa-Signature header: an HMAC signature of the request body, computed with the webhook's secret key. Verifying this signature on your endpoint confirms the request really came from HIPAAtizer and wasn't tampered with in transit.
The webhook's secret key is generated when the webhook is created and can be retrieved from the webhook's settings panel. Treat it like a password: store it in a secret manager, never commit it to source control.
If you don't see a secret key field in your webhook editor, contact support@hipaatizer.com. Signature verification can be enabled per account.
Viewing delivery logs
Each webhook keeps a log of its recent delivery attempts, including the response status code, response body, and timestamp. Open the webhook from the list and check the Logs section. A successful delivery shows a 2xx status (typically 200 or 201). Anything else points to a configuration or connectivity issue, see Troubleshooting below.
Import and export
The Import JSON button on the Webhooks list page accepts a JSON file with a complete webhook configuration. This is useful for:
- Moving a webhook from one form to another.
- Sharing a configuration with a colleague or sub-account.
- Backing up complex webhooks before making changes.
To export a webhook, open it and copy its configuration from the editor.
Troubleshooting
Symptom: Webhook delivery fails with status 401 or 403
Cause: The receiving endpoint rejected the request because the authentication header is missing, malformed, or contains an invalid token.
Fix:
Open the webhook and check the Custom Headers section. For Bearer tokens, the key must be Authorization and the value must start with Bearer followed by the token. For Basic Auth, the value must start with Basic followed by the Base64-encoded username:password. The header key must always be Authorization, not Basic Auth. If your token has expired, generate a new one in the receiving service and update the header.
Symptom: Webhook delivery fails with status 404
Cause: The URL is wrong, or the path/resource on the receiving service doesn't exist.
Fix:
Double-check the URL field for typos. For APIs that include IDs in the path (e.g., Airtable's base ID and table name), confirm those values exist and are spelled correctly. If the table or resource name contains spaces, URL-encode them as %20.
Symptom: Fields arrive as null or empty in the receiving system
Cause: The variable name in the request body doesn't match a field's Unique Name in the Form Builder. This often happens after renaming fields or republishing a form.
Fix:
Open the form in the Form Builder, click each field referenced in the webhook, and check its Unique Name in the right panel. Update the variable in the request body so it matches exactly. The syntax is ${uniqueName}.
Symptom: Custom templates aren't visible in a sub-account
Cause: Templates are scoped to the account where they're saved. A template created in a parent or super-account doesn't automatically appear in managed sub-accounts.
Fix: Save the template directly in the account where it's needed, or use Export JSON / Import JSON to move the configuration. If you need shared templates across all of your managed accounts, contact support@hipaatizer.com.