

Tags
The Tags tab in Form Settings lets you create and manage Communication Tags for a form. Tags are color-coded labels that appear in your Inbox, where they help you filter, organize, and track submissions and secure messages.
Tags get onto a submission two ways:
- Manually. You add or remove tags yourself on any item in the Inbox, at any time.
- Automatically. A tag is applied when a patient creates a new submission. You can apply a tag to every submission of a form, or only to the submissions that match conditional logic you define.
Tags you create are shared across your account, so you only need to create each one once and can then reuse it on any form.
Tags are only available in the new Inbox. If you don't see tags in your Inbox, click Switch to the New Inbox in the top-right corner. If the option to configure tags isn't visible in your Form Settings, contact Support and we can enable it for your account.
What you can do with tags
- Create reusable, color-coded tags shared across your forms and Inbox.
- Automatically assign one or more default tags to every new submission of a form.
- Assign tags conditionally, based on the values a patient submits (for example, tag by procedure type or message category).
- Manually add or remove tags on individual items directly in the Inbox.
- Filter and organize submissions and messages by tag to track workflow status (for example, New to In-Progress to Completed).
Where to find it
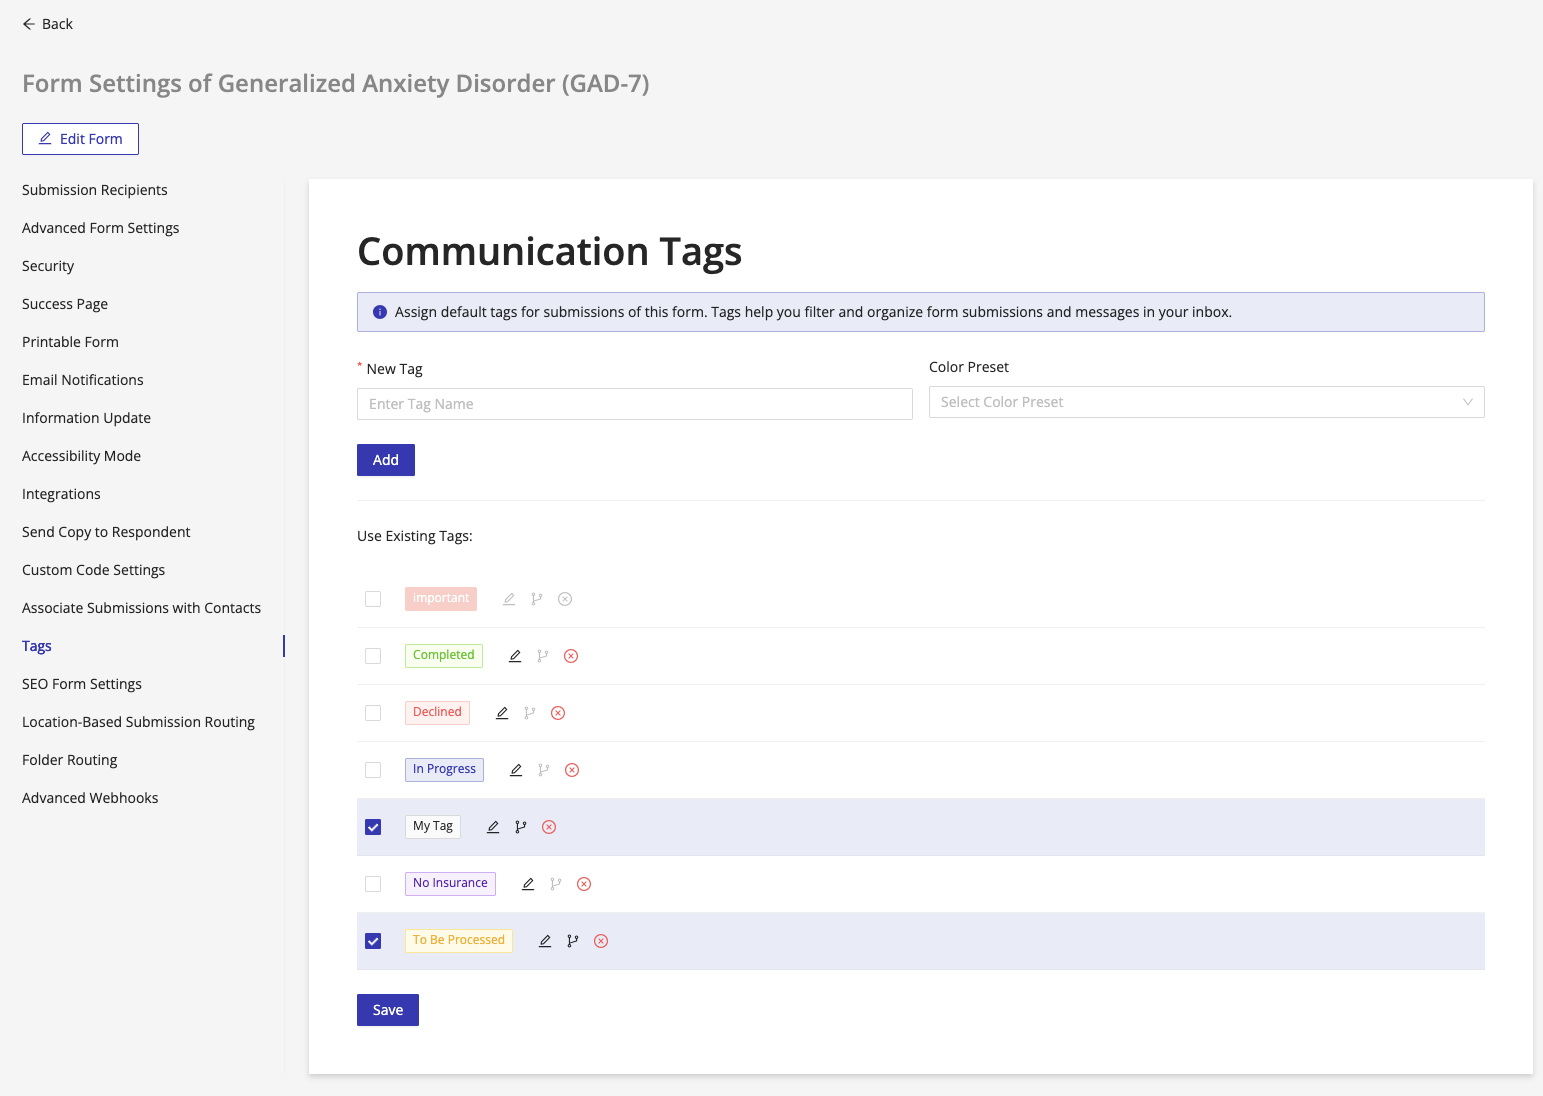
Tags are configured per form, in Form Settings.
- Go to My Forms.
- Click the Form Settings icon next to the form you want to configure.
- Open the Tags tab.
How it works
Tags applied on this tab become the form's default tags: they are assigned to submissions automatically as they arrive, so your team can immediately filter and triage new items in the Inbox. Tags you create here also join your account's shared tag library, so they're available to reuse on other forms and to apply manually in the Inbox.
Every tag can also carry its own conditional logic, so a tag is applied only when a submission meets the rules you define, instead of being applied to every submission.
Create a new tag
- In the New Tag field, enter a tag name (for example,
New,In-Progress, orFollow Up). - Open the Color Preset dropdown and choose a color. Presets include success, processing, error, default, warning, pink, red, and yellow, among others.
- Click Add.
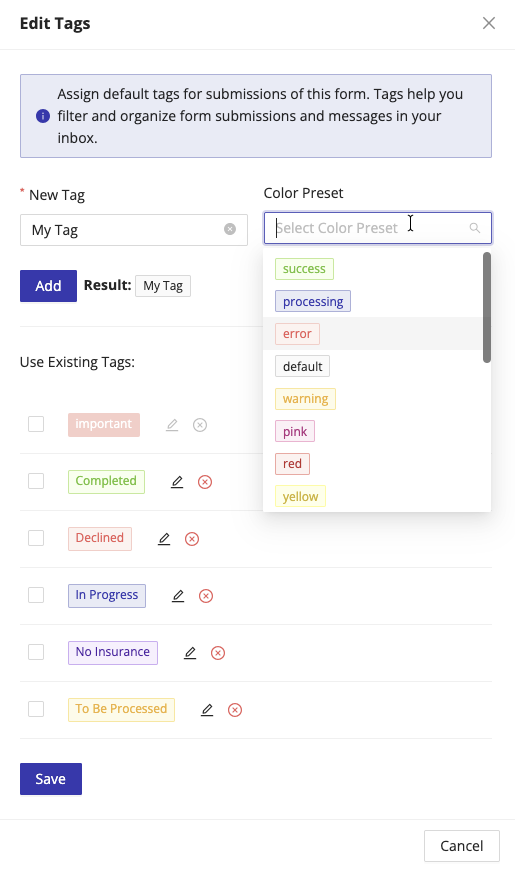
The new tag appears in the Use Existing Tags list below and is added to your account's shared tag library.
Assign default tags to this form
Under Use Existing Tags, check the box next to any tag you want assigned automatically to every new submission of this form. Uncheck a tag to stop it from being applied by default.
Each tag in the list has controls for:
- Edit (pencil icon): rename the tag or change its color.
- Conditional Logic (branch icon): apply the tag only when your conditions are met (see below).
- Delete (X icon): remove the tag.
When you're finished, click Save.
Deleting a tag removes it from your shared tag library, not just from this form. Make sure the tag isn't in use elsewhere before deleting it.
Assign tags with conditional logic
Instead of tagging every submission, you can have a tag applied only when a submission matches specific answers: for example, tagging submissions by the procedure a patient selected or the category of a contact-form message.
- In the Use Existing Tags list, click the Conditional Logic (branch) icon next to the tag.
- Check Enable Conditional Logic.
- Choose the Tag Action When Conditions Are Met:
- Set Tag: apply the tag only when all conditions evaluate to True.
- Do Not Set Tag: apply the tag unless the conditions evaluate to True (the tag is set only when the conditions are not met).
- Choose the Logical Operator:
- AND: all conditions must be True for the action to apply.
- OR: at least one condition must be True for the action to apply.
- For each condition, select a Condition Component (a field on the form), a Condition (for example, Equal), and a Value to compare against.
- Click the + button to add more conditions, or the trash icon to remove one.
- Click Save.
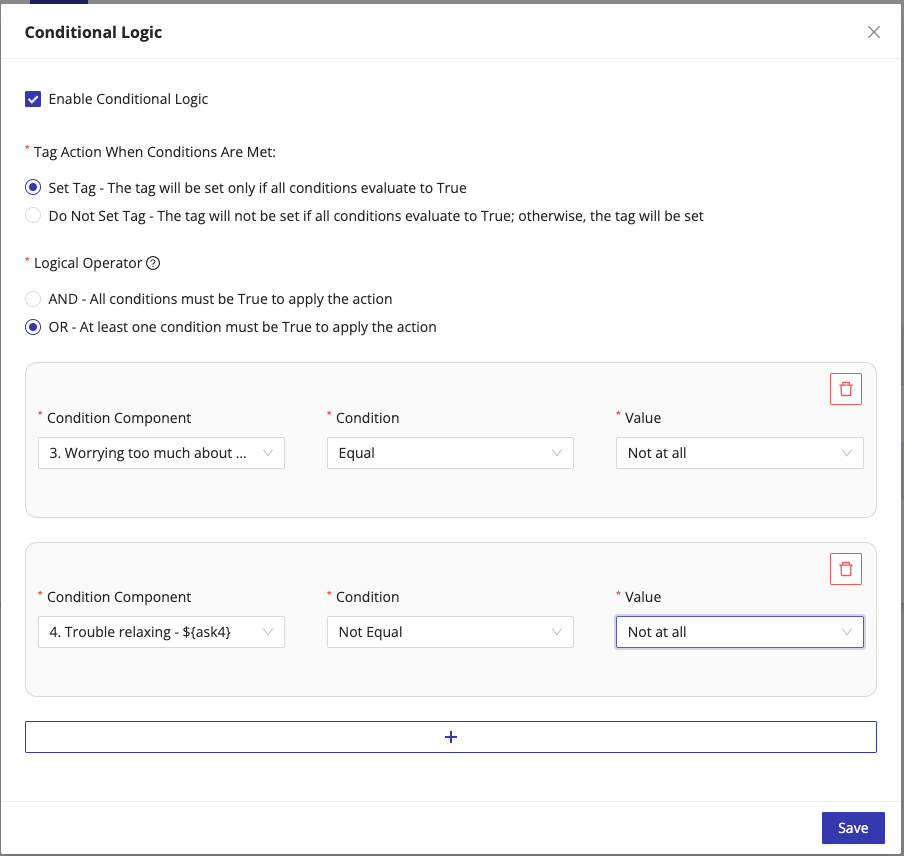
Conditional tagging works well for routing and triage. For example, on a "Contact Us" form with a Message Category field, you can set a Billing tag when the category equals Billing, and a separate Records tag when it equals Medical Records Request, so each team can filter the Inbox to just their items.
Conditional tags and Folder Routing are configured almost identically, both acting on a new submission based on the answers a patient gave, so it helps to know which one you want.
A tag labels a submission where it is. The submission stays in whichever folder it arrived in, it can carry several tags at once, and each tag's conditions are evaluated on their own. Folder Routing instead moves the submission, into exactly one folder, with the first matching rule winning.
They are complementary. Use Folder Routing to put a submission in front of the team that owns it, and tags to track its status once it is there.
Using tags in the Inbox
Default and conditional tags appear in the Tag column of the Inbox. You can also manage tags manually there:
- Add or remove a tag on a single item by clicking the Add Tag icon on the Inbox row or in the item details panel. You can pick from existing tags or type a new tag name: entering a name that doesn't exist yet creates the tag and adds it to your shared tag library.
- Update tags in bulk by selecting several items and choosing Update tags from the bulk actions menu.
- Filter by tag to focus on a particular workflow.
Tag filters in the Inbox are not persistent. If you filter by a tag and then leave the Inbox, you'll need to reapply the filter the next time you open it.
Users who are assigned to a specific location can still use any tags you create.
Each form has its own Tags settings. To assign default or conditional tags for another form, repeat these steps in that form's settings. The tags themselves are shared across your account, so you only need to create each tag once.
Related
- Inbox: where tags are displayed, filtered, and managed
- Folder Routing: files submissions into Inbox folders using the same kind of conditional rules
- Managing form submissions: filtering, bulk actions, and day-to-day triage
- Conditional Logic: the same rule-building approach applied to form fields
- Submission Identifier: another way to organize and search submissions