Conditional Logic
Conditional Logic allows you to build dynamic forms that show or hide entire rows (and all fields within those rows) based on user responses to other form fields. This is useful when certain questions are only relevant under specific conditions.
If all rows on a form screen are hidden as a result of Conditional Logic, that screen is automatically skipped for the user.
What you can do with this feature
- Show follow-up questions only when specific answers are selected
- Skip entire screens in multi-page forms when they become irrelevant
- Block form submission based on disqualifying answers
- Keep forms compact by revealing repetitive or optional sections only when needed
Requirements
- Available for Covered Entity accounts on Simple Compliance Gold Plus and higher
- Available for Sandbox accounts
- Form must contain at least one supported Condition Component
Where to find it
How it works
Conditional Logic is applied at the row level.
Each row can be configured to Display or Hide based on one or more rules that reference other fields in the form (called Condition Components).
Supported Condition Components
Only the following components can be used as Condition Components:
Actions
For each row, Conditional Logic can perform one action:
- Display - show the row only when conditions are met
- Hide - hide the row when conditions are met
Conditions
Each rule compares a Condition Component's value using one of the following operators:
- Equals
- Does not equal
- Contains
- Does not contain
For Contains and Does not contain, multiple values can be selected.
Multiple rules
You can add multiple rules to the same row and combine them using:
- AND - all rules must be true
- OR - at least one rule must be true
The selected logical operator applies to all additional rules in that Conditional Logic block.
Configure
Step 1: Add Condition Components
Add one or more supported components (Dropdown Select , Single Choice , Multiple Choice Checkbox) to your form. These will be referenced in Conditional Logic rules.
Step 2: Create the target row
Create a new row and add the components that should be conditionally displayed or hidden.
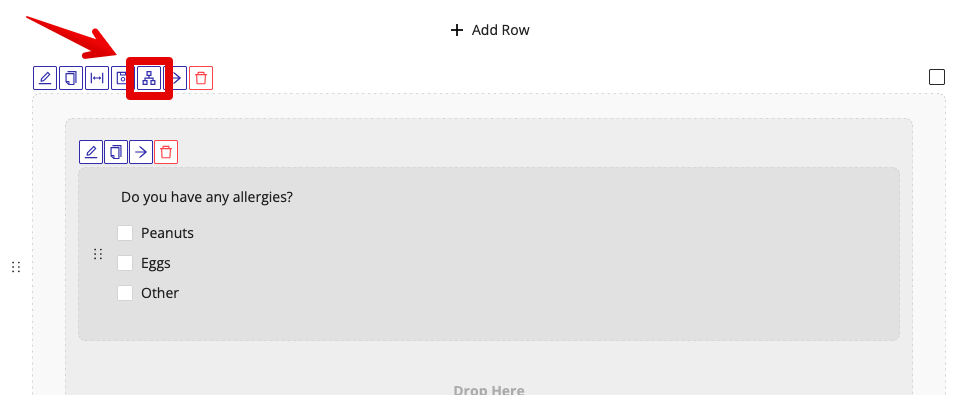
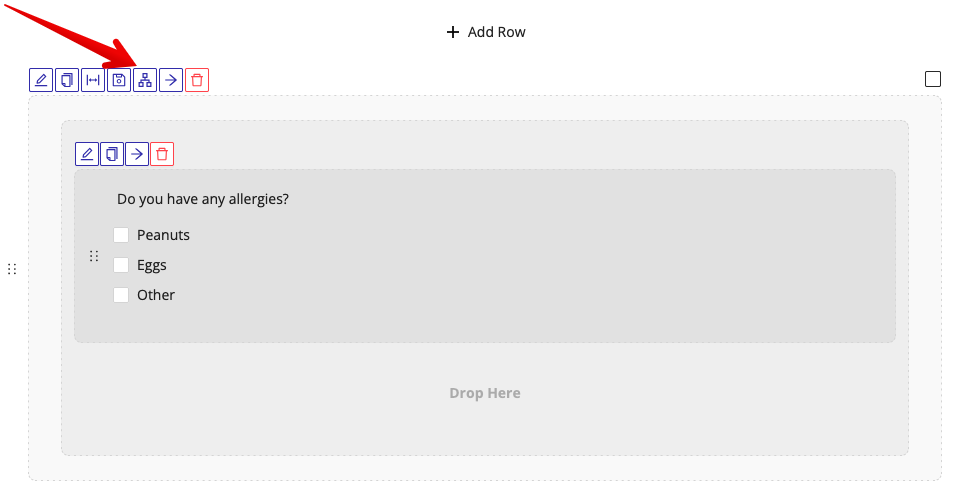
Step 3: Open Conditional Logic
- Click the Conditional Logic icon on the row
- Select the Action:
DisplayorHide
Step 4: Define rules
For each rule:
- Select the Condition Component
- Select the Condition
- Select the Value to evaluate against
Step 5: Add additional rules (optional)
- Click Add Rule
- Choose AND or OR
- Add more conditions as needed
Use cases
Show follow-up input when "Other" is selected
See step-by-step instructions
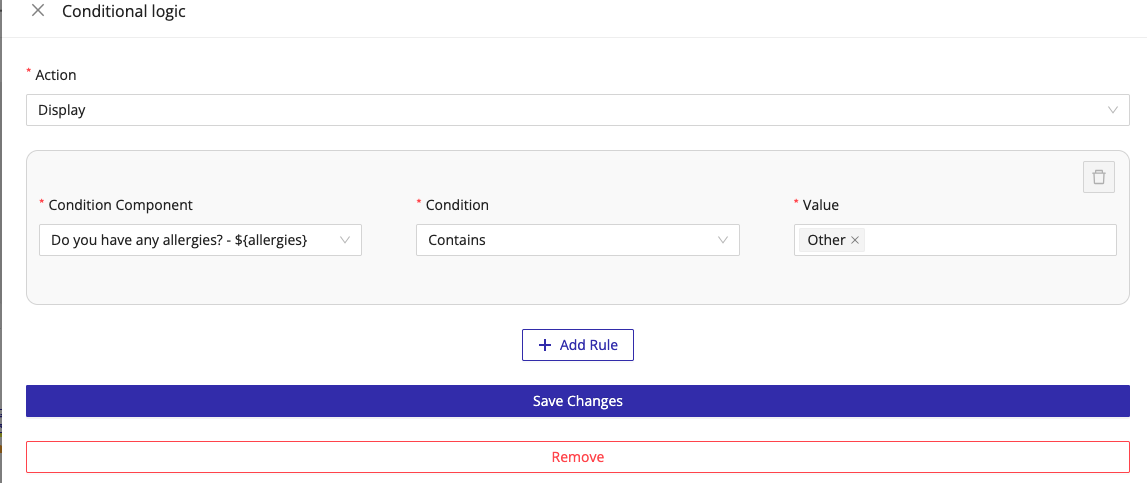
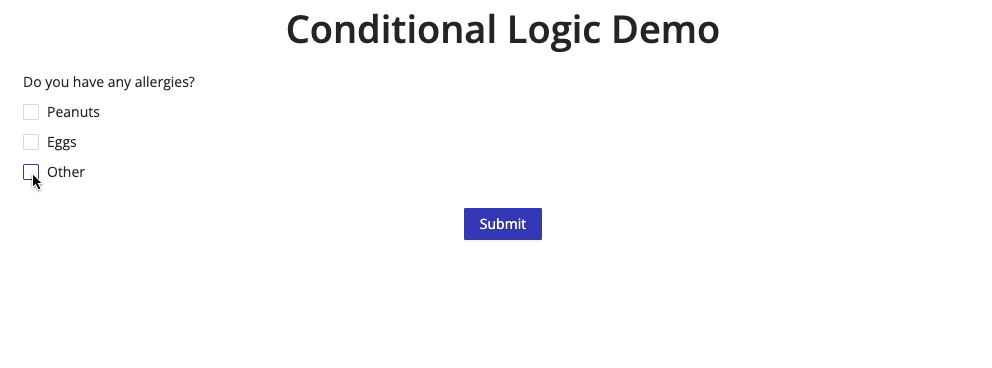
Goal: Ask the user to specify details only when needed.
- Add a Multiple Choice question: "Do you have any allergies?"
- Include an option called "Other"
- Create a new row with a text input: "Please specify other allergies:"
- Set Conditional Logic:
- Action: Display
- Condition Component: "Do you have any allergies?"
- Condition: Contains
- Value:
Other
Result: The "Please specify" input appears only when "Other" is selected.
Skip an entire screen
See step-by-step instructions
Goal: Remove unnecessary steps from a multi-page form.
- Place all rows on a screen behind Conditional Logic
- Configure each row to Hide when a specific answer is given
- When all rows are hidden, the screen is skipped automatically
Result: Users never see irrelevant screens.
Repeating optional sections (e.g., medications)
See step-by-step instructions
Goal: Allow users to add multiple items without overwhelming the form.
- Show the first medication name + dosage fields by default
- Add a checkbox labeled "Add another medication"
- Place the next medication fields in a new row
- Use Conditional Logic to display that row only when the checkbox is checked
- Repeat as needed
Result: Users control how much information they provide, and the form stays compact.
Block form submission based on disqualifying answers
See step-by-step instructions
Goal: Disqualify the user after a specific answer and prevent them from submitting the form.
- Add a new screen immediately after the screen with the disqualifying question.
- On the disqualification screen, add a row with a Paragraph component containing the disqualification message.
- Configure Conditional Logic for that row so it only Displays when the disqualifying answer is selected:
- Action: Display
- Condition Component:
<Disqualifying question> - Condition: Equals (or Contains, if it's a Multiple Choice)
- Value:
<Disqualifying answer>
- If there are any other rows on the disqualification screen, apply the same Conditional Logic rules to those rows so the entire screen behaves consistently.
- On the disqualification screen, click Edit for the Submit / Continue button and toggle Hide Button so the user cannot move forward or submit from that screen.
Result: If the user gives a disqualifying answer, they'll see the disqualification message on the next screen and won't be able to continue or submit. If they do not give a disqualifying answer, the disqualification screen is skipped and the user continues to the next screen--or the form submits if it would have ended there.
Troubleshooting
Symptom: Row never appears
Cause: The Condition Component is not one of the supported types, or the condition value does not match exactly.
Fix: Verify the component type and confirm the option labels match the selected values.
Symptom: Screen is skipped unexpectedly
Cause: All rows on the screen are hidden by Conditional Logic.
Fix: Ensure at least one row remains visible, or confirm that skipping the screen is intentional.
Symptom: Rules behave inconsistently
Cause: Incorrect AND / OR logic between rules.
Fix: Review whether all rules must be true (AND) or if any rule should trigger the action (OR).